


Word Sections
I’ve deliberated over writing about section (and section breaks) for a while because I was wondering about the best way to approach this particular topic.
You see, though essential, sections in Word are a little [over-]complicated.
As I mentioned before, the underlying structure and design of Word goes back a couple of decades and, while they’ve added new elements and functionality to it, many of the bread-and-butter components have stayed the same.
And that’s not great for the learner as to create professional looking documents with great layouts requires an in-depth knowledge of 2 principal components: styles and sections…
…and, if you can master these your battle is practically over!
Styles impact on the visual layout as we know, styles help the structure of your work, how your document looks, feels, flows, and reacts: we all know the visual aspect of it, but try writing a long document and just use the one ‘Normal’ style and see how quickly it becomes unmanageable!
Of course, there’s a good chance you’ve already experienced this yourself: I did when I first started, I didn’t know any better and when you first see all those menus, buttons and everything…
…the interface IS daunting!
(I read somewhere years ago that the imposing and ‘busy’ interface it was a deliberate design factor to justify the price of the software; I don’t have the source, but remember it well – and is why I created the 2 custom menus in 1-Click Book Creation, so you don’t have to worry about where everything is and can just get on with writing and formatting your books.)
But, when you realise you only need a small part of what’s in front of you, its impact is lessened.
Of course, if we could judge the importance of the components by their size on the Word visual real estate, then given the size of the styles section on the ribbon, we can see why it is up there among the ‘Hey, this is essential’:

And believe me, that’s just a small part of styles. There is so much more which just isn’t visible unless you dig deeper.
But this isn’t about that. This one’s about sections and section breaks…
…and, unless you know where it is, you might blink and miss it.
Section Breaks Button
You can find the section breaks button on the Page Layout menu, just above Line Numbers:

Someone at Microsoft decided to hide it away almost, but Word section breaks are SO important.
Why?
Because there are so many parts to them, and understanding their workings is critical to working with Word effectively.
So, let’s start with the very basics, our blank page…

A blank page consists of just 1 section (we can see this if we look in the bottom left corner):

1-page, 1 section, straightforward enough.
But if I quickly add 20 or even 200 pages to the document, I will still only have 1 section.
However, staying with our single page, if I double-click on the header, I get the Header & Footer Tools menu and see I have an option to select a Different First Page:

Now, though I can opt to have the first page of my section function differently from the remaining pages of this section, this is not in itself [strictly] creating a new section or anything within this 1st section, but it is creating a different element within this first section.
What this means is when I add text to my page and it flows onto and creates a second page automatically, the characteristics of this second page will be different to that of the first. A good example of this is where you see the first page of a chapter starting hallway down the page and all subsequent pages in the chapter start at the top.
I cover how to do this in the video training for 1-Click Book Creation, but if you check out the 1st page of each chapter in the How to Publish Your Book on CreateSpace and Kindle… you’ll see what I mean:

Here you can see the last page of chapter 3 has a page number on the outside of the even (left-hand) page, plus an underline (both of these are in the header), and the text is aligned to the top of the page. In contrast, the new chapter begins 1/3rd of the way down the page, and does not have any header at all (so no page numbers). It also has an initial drop-capital but adding this has no relation to section breaks.
Subsequent pages of chapter 4 revert to the previous format, with page numbers on the outside, underlined, and a running head containing the chapter title on the odd (right-hand) page.

These would be impossible with mere page breaks.
What Are Section Breaks For?
So, as we’ve seen section breaks allow us to do different things to different parts of our document and they work with both on page components: text, tables, images, etc., as well as what we have in the Headers & Footers.
As can be seen in the images above, Headers & Footers in your Word document are separate to the main page that you add your text to; and can be considered to be a ‘document behind a document’ (almost).
With your main page, anything you add on the page will remain on that page, and won’t appear anywhere else; however, with Word, Headers & Footers are continuous, and anything placed in a header or a footer will repeat itself exactly in every header and footer of that section.
The practical application of this is this allows us to add page numbers, copyright information, title information, hyperlinks, and anything else we want at the top or bottom of every single page.
This is great.
But, if we want something different in another header or footer in a different part of the document, e.g. you want a ‘Running Head’, then it will repeat in every header of that section.
As you can see, this is great because it keeps things consistent and it looks good; above all, it is easy to do.
But, if you want to do something different in your document, such as add a new chapter, you want the title of that chapter to appear instead of the first, then you can’t just add a page break—they just create new pages; no, you need a new section.
Types of Section Break
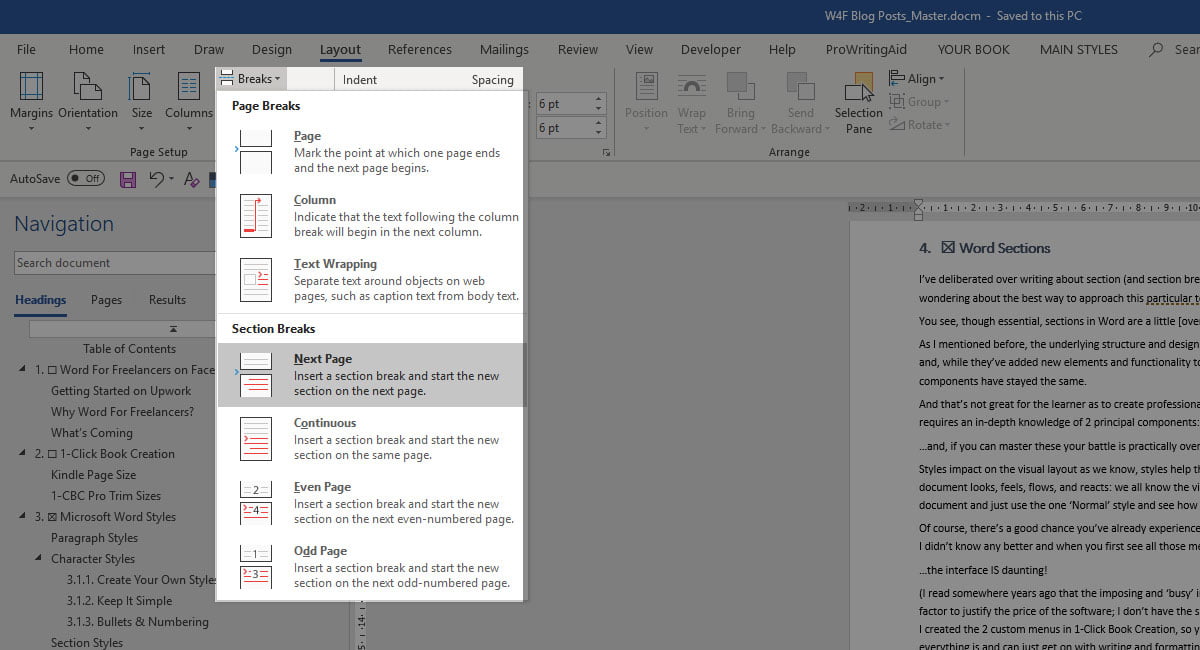
But, which section break do you add, as there is quite a selection:

The top 3 are under the label ‘Page Breaks’ which is a misnomer as only the top one is a page break (the others having different functions which, interestingly enough, are not to create a new page); and, under Section Breaks we have 4 options:
- Next page: this is straightforward and creates a new section on the next page. This differs from the even and odd page breaks in that it does not override your global document or book setup: check-out Page Layout > ‘Page Setup’ (in the ribbon area click on Size > More Paper Sizes and then on the Layout tab).
- Continuous: this creates a new section where your cursor is and does not create a new page. Its principal function is to allow you to change the layout and characteristics of a page, e.g. to change the number of columns on a page, the background colour, set a print area, etc.
- Even page: this adds a next page section break forcing the next page to be an even-numbered page (a left-page in a book layout).
- Odd page: this adds a next page section break forcing the next page to be an odd-numbered page (a right-page in a book layout).
As you can see, these all perform specific functions.
One of the important things to note is a section break is ONLY used when you want to change the layout and structure of a document.
Section breaks are never used to just add a new page (if you do that, you will likely have a whole host of problems), but people do use them in that manner…
For example, I was sent a document last week to see if I could help out with the page numbering. A quick look tells me why:

So, with a 405-page book we have a mind-boggling 183 sections. Trust me that is going to cause you headache after headache and your book will do weird stuff every time you open it or work on a different part of the document.
A nightmare!
But the solution was easy and, all told, it took me a grand total of about 3 or 4 minutes (including rebuilding the Table of Contents).
Here’s what it was after I’d finished with it:

Four sections, all the rest were page breaks…
…not section breaks.
However, it must be said, if the styles were set-up correctly, the manual page breaks wouldn’t have been needed.
So, with 183 section breaks it’s no wonder the page numbering wouldn’t work. I can only speculate at how long this person had been trying to resolve this themselves.
Don’t use a section break if all you need is a new page (that’s what Page breaks are for).
Unlinking Sections
Going back to what we did earlier, if you add a section break and have already specified the Different First Page option, then remember that different things are going to happen between the page immediately following the break, and subsequent pages in that section (refer back to the images of my book ‘How to Publish Your Book on CreateSpace and Kindle…).
But, if you plan on doing something different in this new section, then you need to tell Word that.
I must admit that I find this part weird, as the whole reason we add a section break is because we want to do something different to our document; maybe we want to change:
- portrait page orientation to landscape;
- landscape orientation back to portrait;
- background colour;
- page numbering format
- page numbers
Or even:
- add/remove a running head
- insert a new chapter page.
But whatever it is, we add a new section because we want to do something different…
…but Word links it to the previous section by default.
So even though you want to do something different, you still have to go that extra step and unlink the sections.
Fortunately, it’s very easy to do:
As soon as you insert your section break, you need to place your cursor in the new section.
Then you double-click on the header or footer in that section.
The Header & Footer Tools dialog will show:

Click on the Link to Previous button to deselect it and unlink the sections.
Note: in Word, sections link from bottom > to top.
So, if you add 4 sections breaks, and unlink 1 to 2, then 2 to 3, and 3 to 4 will still be linked; and, if
you need to do these also, make sure you do.
This sounds easy, but as you can see in the image above, the page number in the new section is 1. At the time of writing, it was actually page 24, so you need to link the page numbers back to the previous section. To do this:
Right-click on the page number [in the header], select Format Page Numbers:

In the subsequent dialog, select Continue from previous section:

You will need to do this for each section.
Relinking Sections
Relinking sections is easy, it’s just the reverse of the above. Remember though, Word links sections from bottom to top, so when you’re relinking, you’re linking ‘up’, so the current header or footer you’re relinking will change and adopt the same H&F as the previous section.
If you want to make sure all goes well, make sure you highlight everything in your header/footer and copy it before you click on the relink button — just in case. Alternatively, you can use Ctrl+Z (undo).
Sections have been a pain for a lot of years…and they still are.
They will screw you up, but you have to get messed up to learn how they work.
Then you can avoid the pitfalls.
It just takes time.
But you will get there.


